Thursday, September 26, 2013

The Minimal Stroke Exercise...It's Back!

Tunnel Through the Trees, pastel, 8x6

In today's world, we live in a society in which we don't like being told we have a limit. We love phrases like "unlimited minutes" and "unlimited miles." But of course, sometimes too much of a good thing can be bad. And even the newest pastel artists quickly find out that too much pastel pigment on a surface is usually a VERY bad thing.

I like to revisit this exercise with my students every so often. It's a great one to do with both beginner and experienced students. Not only do I always get positive feedback from students about how helpful it is to them, but I find it to be a great exercise for me personally. For me, doing these exercises reinforces the importance of economizing every mark that I make on a painting. Each extraneous, unnecessary stroke on a painting weakens the impact of the work.

The above painting is a completed piece that was begun as a 100-stroke demo. Below is how it appeared after 100 strokes (okay, it may have been around 105)...


The completed version was with a total of about 5 more minutes on top of the 100-stroke exercise.

It was suggested to me to occasionally feature some of my student's work on my blog. Below is today's effort on this exercise done by Judy Tiller, who's been studying with me for a couple of years now. I thought Judy did an excellent job choosing a good combination of colors and accurate values, and capturing the basic elements of the landscape scene with good economy of strokes!

Judy Tiller's minimal stroke painting

Below is the reference photo that my students and I worked from today...


If you'd like more information on this exercise, you can click the following links to previous blog posts on this topic:
Minimal Stroke January 2013
Minimal Stroke April 2012
Minimal Stroke January 2012

Thursday, September 12, 2013

Still Life: Assembly Required

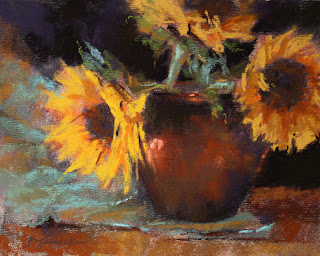
Sunflower Trio, pastel, 8x10

Although I'm primarily a landscape painter, I enjoy painting still life, too. A few of my pastel students sometimes accompany me on weekly plein air outings, but most of my students prefer working from photos. So every once in awhile I hold a still life class in order to get everyone out from behind the photos and work from life.

But there are challenges with doing this in a class setting. If you're limited to the space available in the studio, everyone in the class will need to huddle around one still life setup. And no one person (except the instructor who set it up) has control over the placement and lighting of the still life objects. Basically, you get what you get from where your easel is set up. That's the case in my studio where I hold classes. In other art centers where I've taught, I've had the use of larger studios and the ability to provide each student with their own space to set up their own still life objects, but they still needed to share lighting.

I personally feel that it wasn't until I started composing my own still life set ups that I really could do this type of work to my satisfaction. Maybe it's the control freak in me, but there's nothing like having total control over the objects selected, surface, background, arrangement, and the all important LIGHTING.

So for this week's class, I held a "demo only" class and went over what to consider when getting a still life set up...encouraging my students to put these ideas to work at home, where they can take advantage of that "total control" thing.

Before we got to the topic of lighting, we discussed still life composition and decisions that need to be made up front which will affect the composition. One such decision is at what level in relation to the viewer's eye to place the arrangement (overhead view? eye level?). As a landscape artist, an equivalent decision I usually make up front before painting a landscape is regarding a high horizon vs. a low horizon. Shadows and reflections (and composing these elements) as an integral part of the composition were also discussed.

I tend to approach still life in a similar manner to plein air painting. I use a viewfinder to help me determine where to crop. I also make use of the camera on my phone to snap a quick shot and quickly review various ways to crop. For plein air painting, I use both of these tools. With using the camera snap shots, I can quickly flip through the various compositions and see which ones work better than others.

On to lighting...I've noticed that many accomplished still life artists tend to arrange their subject matter within a controlled lighting environment; either some type of enclosure or area in their studio in which they can block out or direct controlled lighting.

Below is my very crude attempt at creating a still life environment. If I were to begin specializing more in still life, I have to say that I'd certainly want to improve upon this. But the objective here was to more carefully control and direct the light source and enhance/darken the shadow areas. Without an enclosed area, the area in which the objects are placed receive too much light from various areas of the room. Another option is to darken the entire room, but in my studio during the day, too much light comes in through the windows. After I got going with my demo, I wished I extended the dark cloth on all three sides in order to darken the shadow areas some more. Like any other genre, it takes practice in order to master the subtleties of setting up a still life. The best still life artists are able to create a sense of drama with the ability to get focused lighting exactly where they want it. And many still life artists take as much (or more) time composing their arrangement as they do painting it.


But for the purposes of today's class, the goal was to simply inspire my students with a few ideas to work from life at home. Hopefully they'll all do their homework!
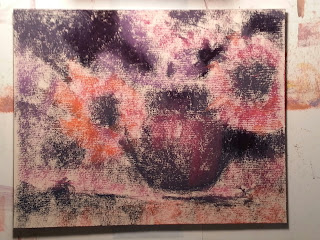

A preliminary block-in for Sunflower Trio.

Saturday, September 7, 2013

Workshop Wrap-up - The Art Loft, Dahlonega, GA

Shady Refuge, oil, 8x10

I just spent a fantastic two days with a wonderful group of artists in Dahlonega, GA teaching my "Composition Boot Camp" workshop at the Art Loft. Anita Elder, who owns and runs the Art Loft, does an incredible job taking care of students and instructors, making sure it's an excellent experience for everyone! The workshop was open to oil painters and pastel artists, so I demonstrated in both media.

Directly above and below are my demos from the workshop. They were both started as "block-in" demos working from thumbnails (see below), completed later after the demonstration time.

Resting Place, pastel, 6x12

Thumbnails were a big deal in this class. Students had to first develop several thumbnail sketches for each painting according to a list of composition guidelines that I suggested, and then take a small painting only to the point of blocking in the composition, working from one of their thumbnail sketches. By the end of the workshop, students ended up with lots of sketches and several starts to small paintings in which they carefully planned every shape within the composition. (No details allowed!)

The students in the class and I all agreed that the next time I teach this workshop, I should use a timer for the thumbnails and the painting block-ins. This would better encourage focusing only on the big shapes and prevent the tendency to want to labor over details.

Below are examples of my thumbnail sketches, and the block-ins that I demonstrated from one of the thumbnails for each.


My next couple of workshops on the calendar are pastel workshops. One in Charlotte, NC for the Piedmont Pastel Society, Nov. 4-7 (this one is full with a waiting list), and then in Littleton, CO at Terry Ludwig Pastels, Jan. 24-26, 2014 (a few spots still left in this one). You can see the full schedule on my website at www.barbarajaenicke.com.

Saturday, August 31, 2013

Composition Workshop in Dahlonega, GA This Week!

Summertime Fading, oil, 10x8

For those of you in the area, this Thursday and Friday (9/5 & 9/6), I'm teaching a workshop on composition at The Art Loft in Dahlonega, GA, where we'll spend two days completely immersed in manipulating landscape subject matter for the most impactful design. We'll pick apart the compositions of noteworthy artists, figure out what makes them work so well, and then apply them to our own landscape work. 

Last month I taught a similar workshop and posted some details and demo shots...click here to see.  

This is open to artists working in pastel and oil/acrylic, and I'll conduct demos in oil and pastel. $225. See www.artloft.net for details. 

Feel free to contact me at barbarajaenicke@msn.com with any questions about this workshop.

Wednesday, August 28, 2013

Flowers in the Field

"They're All Looking At Me!" pastel, 8x10

I'm hoping to plan a floral still life class for my weekly students soon, but thought we'd ease into that subject matter by working with some flowers in the landscape. One of the areas I hope to cover in the upcoming still life class is lighting. In the source photo I used in today's demo, I had some dramatic backlighting to work with, and wanted to make sure to capture that drama. Just as with setting up flowers in a still life, I rearranged the placement of the flowers in the field to create my composition.

Below are some progression shots, beginning with the liquid underpainting. In the underpainting, I set up the backlit glow of the sunflowers with a warm, vibrant orange, and used a variety of purples in the greenery behind the flowers to set that area back and also for some nice contrast beneath the greens that would be added later.


My source photo...


Saturday, August 24, 2013

Workshop Report

Winter Radiance, pastel, 11x14

Heading into Spring, pastel, 11x14


Shown here are my demos from a two-day workshop I just taught in Leland, Michigan at the Old Art Building. I first have to say that this part of Michigan is completely gorgeous. It helped that the weather was also gorgeous the whole time I was there. This was my first visit to the area, and it sure was a treat! I had a fantastic group of incredible artists in this workshop...super nice, and eager to learn as much as possible about this wonderful medium of pastel.

For "Winter Radiance," the primary focus of the demo was on simplifying all of the small details within the tree masses into large connected shapes of about three values. Composition plays a big part in the planning of a painting that deals with busy subject matter. In a one-day composition workshop I taught a few weeks ago, I used a more closely cropped, vertical version of this same source photo, and painted that one in oil. I used a wider version of this same scene here since it makes a great study for simplifying large, busy masses. Click here to see my blog post on this workshop.

I'm getting ready to teach a two-day version of that same composition workshop (for any medium) at The Art Loft in Dahlonega, GA on Sept. 5 & 6. Click here to find out more details on this workshop.

Coming up after that is a 4-day pastel workshop in Lac Du Flambeau, Wisconsin at Dillmans Art Workshop Retreat, Sept. 23-26.

Please visit my website to see my entire workshop schedule through 2014. There's lots coming up!

Thursday, August 15, 2013

Pastel CPR

Vickery Creek Morning, pastel, 16x20

Well, this would have been a great one to show a "before" version. Sorry, I must not have had a enough coffee this morning before starting class today. Our topic today was reworking a failed or overworked painting. I asked my students to bring one such painting to class today, brushing off the excess pastel prior to class, so that just a ghost of the painting image is visible.

Normally if I need to make minor revisions to a small area of a pastel painting, I carefully brush off the excess pigment with a cheap stiff bristle brush. (If I'm brushing off a large area, I wear a mask to do this and sometimes go outside.) For a small area, I can simply rework the area with corrected layers over top of the brushed off area. However, for a larger or more important area, I sometimes want to take it back to a clean, non dusty surface. This usually involves wetting it down with alcohol (regular store bought rubbing alcohol), which is what I like to use for my initial underpainting. For a large area, I'll use a soft, wide watercolor brush (1 1/2" width) and gently apply the alcohol over the area. For a smaller area, I may use the same #8 bristle brush that I use for underpainting.

I've also discovered a fixative that's great for wetting down just a section of a painting...SpectraFix Pastel Fixative. It's meant for reworking a pastel painting, NOT for a final spray when completed. Sometimes wetting just a portion of a painting with a brush will leave a stiff edge between the reworked area and the remaining portion. The SpectraFix sprays on with soft edges between the wet and dry areas. Another advantage is that it's safe to use inside, right there at your easel (no fumes like most fixatives).

Several months ago I needed to rework the bottom two thirds of the painting below...basically all of the snow. The focus of the painting was primarily about the shadows in the snow, so it was important for me to keep the color application clean and in my intended shapes and patterns. I was already happy with my tree line and sky, and wanted to leave that part as it was. But I knew I needed to completely rework the snow by brushing it out and wetting it down. I didn't want to use a brush and end up with a stiff edge between the two areas. (When I start a painting with my initial underpainting, it's much easier to keep edges soft when ALL areas are wet.) I had the bottle of SpectraFix that I bought awhile back, but was never sure how to use it. After testing it on some other failed paintings, I gave it a go on my snow area and it worked just as I wanted it to, giving me a good clean surface to start again with my pastel application to that area.

Downhill Patterns, pastel, 16x20

For "Vickery Creek Morning," many months ago I did use a brush (before I discovered SpectraFix) to wash down a large portion of the bottom left area of the water, but managed to avoid the stiff edges. It was also an area of mostly dark areas, so any stiff edges weren't as noticeable. The painting at that point was set aside until this morning. I used the SpectraFix this morning to rework a couple of areas at the top left and middle. The upper right was the only area I liked, and that part remained from my original effort.

Being careful not to overwork things again, I wanted to livened up the color from my previous effort. I was working from a very rough plein air oil study and a not-so-helpful photo that was taken from a slightly different angle at a later time of day. So my color choices became a bit more interpretive on this one!

Have any failed or overworked paintings lurking in your studio? If they're on a surface that safely accepts liquid media, give it try! Just be sure to get as much excess pigment removed before wetting the surface. Otherwise you'll end up with a pasty surface that won't accept fresh pastel layers very well.

Thursday, August 8, 2013

Up Close & Personal, Part 4

Lining Up, pastel, 8x8

For this last week in our "Up Close & Personal" series, we discussed cropping into subject matter that we're normally inclined to feature within a larger area of the landscape. I encourage my students to take the time to just "play" with their photos on the computer first, and see if there's a better way to crop the scene other than the version they quickly decided on when they looked through their camera at that location.

Chances are, when you're taking photos at a scenic location, especially in a location where you may not get back to for a long time, you tend to want to capture everything with your camera. But when you get back home and load the photos onto your computer, see if you can take your time looking at other possibilities. You may be able to get two or three (or more) paintings out of one photo! I actually get excited about doing this when I come home with a new batch of reference photos!

I had planned to do an 8" x 10" painting for my demo this morning. I had toyed with the idea of cropping into my planned composition a bit more, but went ahead with my original plan. After I finished the demo portion of my class (when my demo painting is about 80 - 90 percent completed), I decided that a more dynamic composition could result from an even closer crop.

My original version.

After a "practice" crop on a photo taken with my phone, I decided to trim it down to an 8" x 8" square format. Once trimmed, I did have to tweak a few elements for better placement within the square format.

Shown below is my original photo. I took this photo several years ago, but could never decide how to approach painting from it. I loved the hay bale formations but didn't find the tree shapes interesting.

The original photo.


The cropped photo.
Lining Up is what my Thursday morning demo later evolved into, after a two inch slice off of the right side.