Thursday, June 27, 2013

Painting the Southwest, Part 2

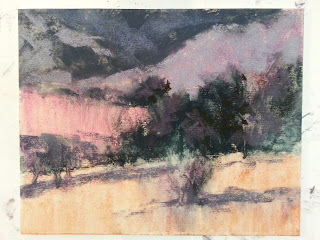
As Evening Takes Shape, pastel, 8x10

With southwest scenery still rolling around in my head from my recent visit to New Mexico, my students were stuck painting the desert again this week. They didn't seem to mind this week either. I think we all agreed...it's a gorgeous part of the country.

For this week's exercise, I thought we'd take the sky out of the mix and crop into the landscape to create some bigger shapes. Not that the southwest doesn't have some amazing skies to paint, but this particular landscape already had some great shapes happening, and I thought the tighter crop would highlight this and make for a more intimate view. However the sky from above is still speaking loud and clear by how its reflected within the landscape elements.

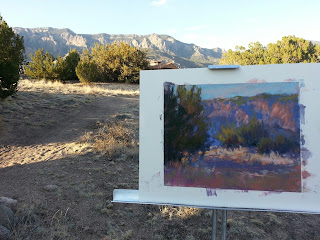
Regarding color palette for this one, I noticed a striking difference in colors (both when painting there on location and from my photos) when the sun got just a little lower in the sky, and also where the sun hit the landscape directly vs. indirectly. Compared to last week's class demo, the photo used for this scene (in the same general location as last week's) was taken just a little earlier in the evening. Last week's was a little later in the evening and was also a view that was catching the setting sun more directly, providing a much warmer color palette chock full of oranges and pinks. Whereas this view caught the sun coming from the left side and not quite as low (or golden) in the sky, providing a more cooler and subdued color palette. Amazing how the angle and direction of the sunlight can affect color so much!

In an initial thumbnail value sketch, I worked out the division of space and angles of these large shapes, connecting similar value shapes wherever possible.* My initial block-in was done from the value sketch (not the photo). Below are some progression shots of my demo, starting with the block-in using about 6 pastels (Nupastels and Rembrandts) then washed down with alcohol and a bristle brush. As I progressed, I added details in "large chunks" before deciding toward the end what few details needed to be even smaller, and continually checked my values for accuracy.


*I teach my process for working with thumbnail value sketches more thoroughly in my workshops. See my website (www.barbarajaenicke.com) if you're interested in taking one of my workshops.

Thursday, June 20, 2013

Painting the Southwest

Where the Road Leads, pastel, 8x10
Whenever I come back from a painting trip, stocked full of studies painted on location and reference photos of the area, I'm always eager to teach a topic in my classes that relates to what's fresh in my memory. I was actually prepared to hold a still life class the week after I returned from New Mexico. What was I thinking? With all that beautiful southwest imagery still floating around in my head? My students will be painting Albuquerque for the next couple of weeks! Since several of my students also visited Albuquerque to attend the IAPS convention, I didn't get an argument.

This week's demo was from a photo I took just a few steps from several areas where I painted on location. The challenge here was to accurately capture the distinct dark and light values on the mountain...without making the shadow areas of the mountain darker than the dark bushes on the ground, or the light areas of the mountain lighter than the sunlit grass. Also within the mountain values, we examined how the shadow areas still had highlights, but those lighter areas within the shadows still had to remain considerably darker than the sunlit areas of the mountain.

Below are a few progression shots. I guess with being out of town a lot the past few weeks, I didn't remember to snap all the shots I normally do in each class, so I've cheated here a bit. The three shots below combine shots from both Wednesday's and Thursday's demo. Both demos looked very similar, so I think I can get away with it here. ;-)

The initial layers are started with about 6 pastels (Nupastels and Rembrandts) and then wet down with alcohol and a bristle brush.


I also wanted to briefly share here another painting I completed this week, working from my favorite study that I painted in Albuquerque. This one began with my typical underpainting, much like I normally begin any of my paintings. Although this wasn't a demo, I felt compelled to snap a quick photo of the underpainting. Later, looking back at it, I was real satisfied with how I simplified the shapes in a very clean yet abstract manner. It really made the rest of the painting go smoothly and more quickly than usual.

Path of Light underpainting

Path of Light, pastel, 16 x 20

Sunday, June 16, 2013

Convention Recaps!

I try to keep up with my blog posts about once a week, but with two trips out of town in the past few weeks, things have gone off track a bit...but for good reasons!

The first trip was to the Oil Painters of America (OPA) National Exhibition and Convention in Fredericksburg, TX last month. I'm still on cloud nine just knowing that I had work included in this extraordinary show. Plus I had the awesome opportunity to meet many artists I've admired for quite awhile and watch some incredible demos! I don't have as many photos to post as I do with what I discuss below, but this event was certainly just as exciting and inspiring!

"Afternoon Refuge" proudly hung in the OPA national show.

Then last week I attended the International Association of Pastel Societies (IAPS) Convention and Exhibition in Albuquerque, NM. This was my second time attending this inspiring week of nonstop pastel EVERYTHING! I watched demos and took workshops from some of my favorite artists, purchased a couple of much needed pastel supply items, and even got in some painting time at some gorgeous locations in the area. I also, again, had the wonderful opportunity to meet many new artist friends.

A couple of other exciting tidbits from IAPS...my painting "December Heat Wave" was awarded an honorable mention by Terri Ford, who judged the Master Circle portion of the IAPS Exhibition, and I also received my Master Circle medallion.

"December Heat Wave" was awarded honorable mention.
This thing is heavy!

Although I've been an instructor myself for a number of years now, whenever I take a workshop, I always make sure to put myself into "student mode" and turn myself into a sponge, absorbing as much new information as possible. As an instructor, I teach methods that I've found to work best for me, so it's tempting to want to approach any painting I do in a workshop using my own method. But I find that it's a waste of time and money to do this in a workshop taken from another instructor. The reason I set aside time and money to take any workshop is to learn how a certain artist does what he or she does. So I turn off all previous knowledge, I do my best to bring exactly the supplies given on the workshop supply list, and try it totally and completely their way. Even if I don't want to later continue to paint exactly like these particular artists with whom I'm studying, I want to find out how they achieve their unique "look."

My first workshop was with Terri Ford. Her "deeper, darker, richer" approach helped me see that a more intense color can be used rather than a lighter value in order to liven up color that may show up dull, or even nonexistent, in a bad photo. After a few attempts at her approach, I found myself making some exciting new color choices I wouldn't normally use. Loved it!

One of my paintings from Terri Ford's workshop.

The other workshop I took was from the amazing Richard McKinley. This was only a one-day workshop, and I sure wish I could have spent more time watching him paint and hearing his comments on my own attempts. I really wanted to better learn his watercolor underpainting approach. So I watched closely, took lots of photos of his demo, and spent lots of time on my attempt. As I mentioned above, I really try to purchase the recommended supplies. I did have a varied supply of the watercolor paint recommended, but I knew going in that I may not have the best quality watercolor paint. They were artist quality, but not the kind Richard uses. I wanted to buy more before the workshop, but it was a budget limitation. This made a difference in the color vibrancy that Richard was able to achieve vs. what I painted.

Richard McKinley's vibrant underpainting.
My much duller underpainting.

My finished? painting with pastel added.
When taking a workshop, I bring a variety of my own photos that are similar to the typical subject matter that the instructor normally paints. And after watching the demo, I choose a photo from my supply that's as similar as possible to what the instructor just painted. In this case the most similar photo I had on hand coincidentally was the one I referenced for the painting I had in the OPA show!

During the convention, I also watched demonstrations by Marla Bagetta, Desmond O'Hagen and Lorenzo Chavez...three of my favs! All were spectacular and a joy to watch!!

I'll end this post with a few pieces I painted on location in Albuquerque among many other incredible artists. All were painted in the beautiful magic hour of the evening light, with the last one at the bottom painted fast and furiously as the light disappeared.


Monday, June 3, 2013

Upcoming Summer Workshops


For artists in Georgia or Michigan, I'm teaching a few workshops this summer...

All-Media Composition Boot Camp - Spruill Center for the Arts, Dunwoody, GA, July 27
and The Art Loft, Dahlonega GA, Sept. 5 & 6

Interpreting the Landscape in Pastel - Leelanau Community Cultural Center, Leland, MI,  Aug. 19 & 20

See my website at www.barbarajaenicke.com for details or message me for more information.